We’re breaking down the details from our UnrealFest talk: Fortifying your delivery pipeline – Repurposing technology for interactive experiences.
We were stoked to be speakers at the first ever UnrealFest to be held down under. And we were even more excited to have the chance to talk about our belief in how lateral thinking and borrowing from existing technologies can revamp real-time pipelines.
In the talk, real-time developers Ash Sewell and Andrew Joy were joined by producer Natalie Robinson for a deep dive into how we’ve integrated live data, automation and analytics into our projects by repurposing solutions from outside of Unreal Engine – in industries and technologies across live shows, web and IT.

What to expect
In this article, we’re going to go over what we talked about during the conference. Whether or not you were able to make it to the talk, this is a tangible recap of what we covered; something to refer to if you’re interested in expanding your solutions kit in new and unusual ways.
We won’t lie, this is going to be a long read. But it is broken up into a few key sections:
- What challenges exist in the pipeline: We’ll talk through some of the common challenges we’ve found in our operations pipeline when creating interactive experiences.
- How we’ve approached these challenges: We’ll give you an example of this all in action by looking at a project where we faced – and solved – some of those challenges.
- How you can apply this in your pipeline: We’ll pepper you with some interesting examples of how you could bring this kind of thinking into your own pipeline.
Hopefully by the end of this you’ll be inspired to think laterally about how taking proven solutions from other technologies could make your delivery pipeline more robust.
Not all things need to exist in the Unreal ecosystem – you can use solutions from other industries and apply them to your own pipeline.
Let’s talk about Ops
In this section we’ll run through the ins-and-outs of DevOps and SysOps – and their challenges – when it comes to real-time experiences. But first up, let’s go through a few definitions for everything we’ll be talking about.
- DevOps is a set of practices intended to reduce the time between committing a change to a system and the change being placed into normal production, while ensuring high quality.
- SysOps is a practice that focuses on administration and monitoring of IT infrastructure including managing and monitoring the hardware, software and networks that make up an IT environment.
What’s most important to note here is that DevOps is not just software. It’s about establishing a culture and environment where building, testing and releasing software can happen rapidly, frequently and reliably. It’s very much a human problem.
It’s important to keep in mind that it’s not just tools that improve a pipeline. Teams need autonomy, and space, to build empathy and trust.
A look at our pipeline
Before we jump into the challenges we face with DevOps and SysOps for real-time experiences, let’s do a quick rundown of our pipeline for developing interactive experiences here at S1T2. You’ll probably notice a lot of similarities with your own pipelines, though chances are there are a few differences in there too.
- Requirements: Determining what features are needed and planning for how to make it all happen.
- Design: Deciding what code architecture is going to be most suitable and putting the required systems and structures in place.
- Development: When we get into the nitty-gritty of production.
- Testing + QA: For us this also includes manual physical testing in a live environment.
- Deployment: Pushing to controlled hardware most of the time
- Operations: Running and monitoring software and hardware in a live show environment.
We need to foster that human-centred mentality – DevOps is a state of mind – throughout the studio. We need to make sure there’s time and space for collaboration between creative, development and operations teams so that they are able to inform each other’s work.
It’s also important to mention that every project we do has different delivery outcomes. We try to standardise what we do as much as possible, but each project will inevitably be unique in some way.
DevOps + SysOps challenges
Okay, now let’s talk about the challenges we face when working in Unreal, and where we can go for solutions. While there is some overlap, these challenges sit largely between the buckets of DevOps and SysOps.
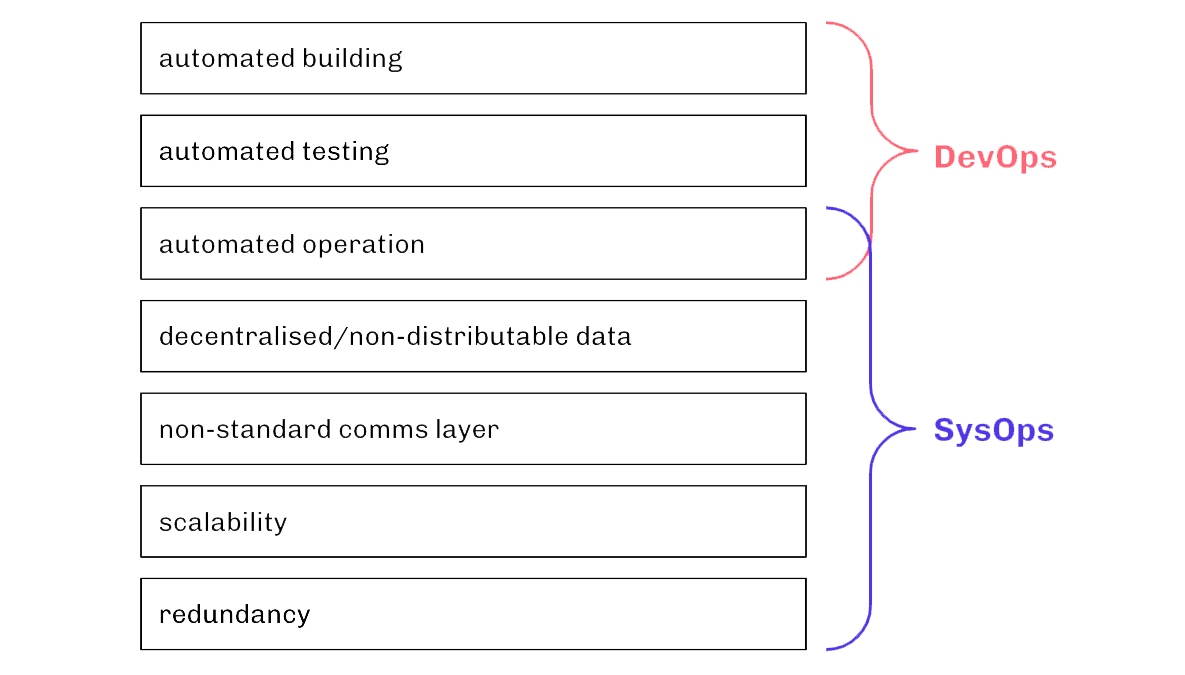
DevOps challenges
When it comes to DevOps, Unreal provides us with some amazing tools for build and test automation. But challenges come when trying to glue those solutions together – especially if you’re a small team.
The tools we have in Unreal also aren’t really built for automated operation. Switchboard has changed this paradigm, but in its current form it only serves a very specific purpose.
SysOps challenges
Most of the time, having data baked into your project is fine. But when there are last minute UI text changes, it can become a pain point.
Now we could use tools like chunk downloader to patch the builds, but it’s not an ideal solution. The process of patching is similar to deploying, and quickly becomes stressful when you’re dealing with large amounts of hardware and short amounts of time. It also puts the onus of delivering content changes on the development team, which can add unnecessary stress.
There’s also the issue of not being able to integrate third party solutions into our standard multiplayer network comms. We often work with other vendors like sound and lighting, or have gameplay features on single-board computers like Arduino which aren’t running Unreal.
We also have issues with being able to scale Unreal servers for our use cases, as well as ensuring that every Unreal instance has some form of redundancy. That said, we won’t go too deep into these last two challenges, as they’re team- and project-specific solutions. But then again, we have been able to solve some of these issues by looking to solutions from data centres – a topic for another time.
Where to look for solutions
So, where should we go for solutions? The web, of course!
As it turns out, cloud computing and large-scale websites have led to web teams addressing the kinds of problems we’re talking about for a long time. They’ve already got solutions to many of our problems, and often those solutions can be easily adapted to fit into our pipelines.
Web dev teams have created lots of different CI/CD platforms that we can adopt to help with automated building, testing and even operation. The proliferation of the internet has given us centralised data and standardised communication layers. And data centres have addressed computing at scale with redundancy and also the automated operation of hardware.
The challenges in action
Now that we’ve gone through the overall pipeline and the challenges involved, it might help to look at those challenges in context. To do that, we’ll give you a bit of a rundown of a project where we faced all of these challenges in one way or another.
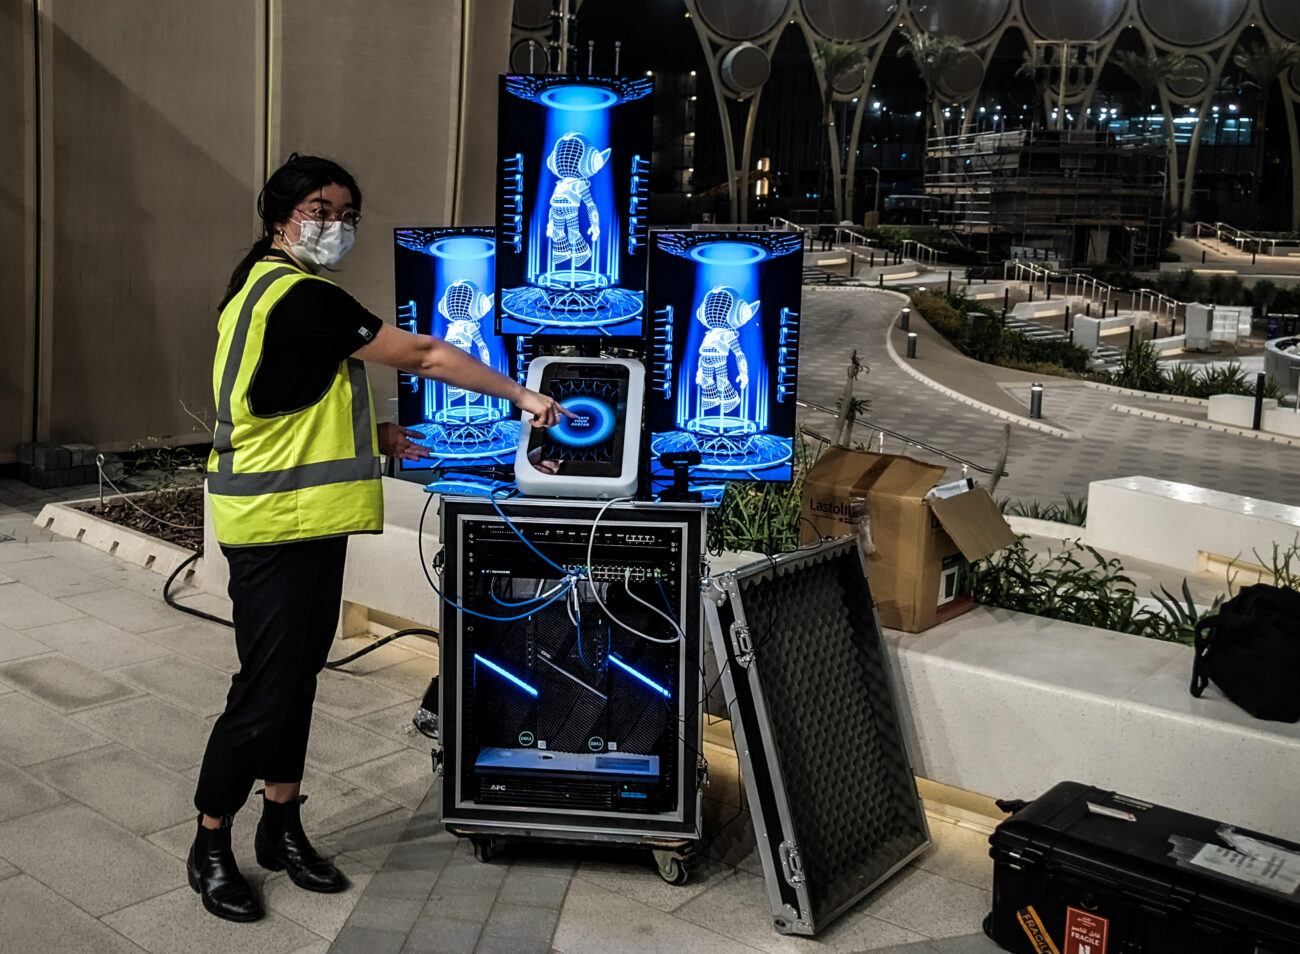
In the lead up to Dubai World Expo, S1T2 was commissioned to design, develop and deploy the world’s largest immersive interactive experience at the stunning Al Wasl Plaza. The experience, “Become a Guardian of Al Wasl”, was unique in its ambition to be not only immersive but interactive at a massive scale – a canvas of over 25,000 square metres with 252 projectors.

World Expo Interactive Projection
Experience the story of a lifetime in the world’s largest interactive projection.
So, how did it work? You’d set up to a custom-designed interaction pod where you would scan your face and personalise your own digital avatar. That avatar would then soar from your pod up into the huge projection dome above, interacting in real-time with the virtual environment and other people’s digital avatars. And then, as a memento of your experience, you would then be emailed a souvenir video.
System architecture
Getting a project of this scale up and running – and keeping it running – required a solid system architecture that looked something like this:

Diagrams are all well and good, but let’s take a moment to unpack some of the details.
First up, the Central Control Unit – aka a rack of servers that route and store information between all the other modules of the system. Andrew will talk more about this soon, as it opened up a whole other pile of problems to solve. That said, using a centralised web server allowed us to introduce redundancy, and standardise the way our project communicated.

Next there were the nine interaction kiosks, each including a Windows machine hooked up to a large TV screen, and a Windows tablet for interaction. Not too much to discuss here.
Then there was the souvenir system, built out of a scalable amount of Windows machines that could render out the souvenir videos and send them to some AWS infrastructure before emailing them out to audience members. And finally there’s the Dome Render System, which was directly connected to the Disguise renderstream and the sound desk for the dome.

As you can see, there were a lot of different things happening on the network. So we needed to implement a system so that we could easily test, deploy and manage software and hardware. Which is where DevOps and SysOps come back in.
At a high level, our process was broken up into two stages. First was our development pipeline, where we would develop and test changes in the office. Then we had a deployment pipeline, where we would deploy builds and retest them onsite.
DevOps pipeline
So, if we start with that first stage, it looked a little something like this:
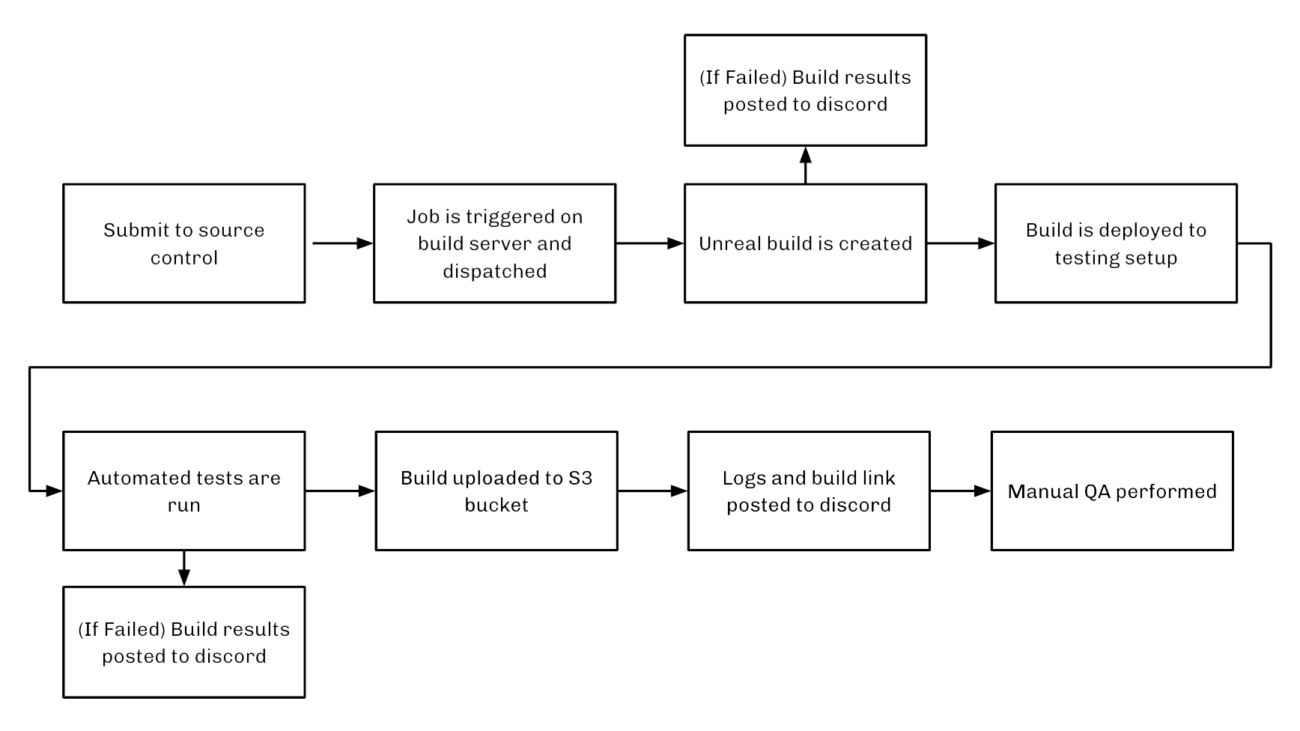
Whenever a developer made and submitted a change to source control, that action triggered a build job on our build server. This would then be dispatched to our build machines in the office to build as an Unreal project. If that build failed, the process was aborted and we would get a Discord notification containing the build logs, allowing us to troubleshoot the issue.
If all went well, the build would be deployed into our in-office testing environment. Here we set up a series of automated procedures to stress-test the build. If any of those tests failed, the process would be aborted and we would get a Discord notification with the test logs.

Otherwise, the build would be uploaded to an S3 bucket for archiving. At this point, a message would be posted to Discord containing a download link for the build. Then we would perform manual QA to test and validate the different test cases for the project.
It’s worth noting that with these large scale projects, it’s not really feasible to have a testing environment that is 1:1 with production. So our test setup is generally just a close approximation or a scaled down version of what would be on-site.
Anyway, if a build passes through this process successfully, it’s ready to move to the next stage.
Onsite pipeline
That next stage is our onsite pipeline, which for World Expo looked like this:

First up the approved build would be downloaded to our setup onsite and deployed to all of the relevant production computers. Automated tests would be run again, with results collected for manual review. If all went well, we would perform another round of QA to retest all of the test cases and make sure everything was working smoothly.
This second QA round was very important because it’s the only time we can test with all of the production systems. We also needed to make sure that our software worked as expected in the unstable production environment. There are lots of issues that won’t show up in a controlled testing environment, so this is an opportunity to find non-software issues and address them.
The challenges we faced
We’ve gone through the systems and pipelines involved in bringing a live environment interactive experience like “Become a Guardian of Al Wasl” to life. Which means we can go back to the challenges Nat talked about, and look at how they manifested in this project.
- Automated building: We needed to deploy new builds to multiple computers that were located very far apart.
- Automated testing: We needed instant feedback as soon as anything was committed, so that we would know if a commit had broken anything before we moved to physical testing.
- Automated operations: We needed to manage over 30 computers to startup, shutdown and initiate crash recovery without the need for manual management.
- Decentralised/non-distributed data: We needed to store/manipulate avatar data across clients, and distribute this data for use across three different Unreal projects.
- Non-standard comms layer: We needed our 3 Unreal projects to talk to each other, and a way for third parties to integrate into the system (lighting and sound was cued and updated depending on avatar customisation).
- Scalability: We needed to have lots of Unreal clients – up to 24 Unreal instances running, with 18 user-facing devices, and 4 computers rendering what was seen on the dome. And a scalable amount of computers rendering souvenirs for users.
- Redundancy: We needed redundancy on every system so that the show would run without fail for 6 months under extreme weather conditions (35 degree heat, dust storms).
In the next few sections we’ll go into each of these challenges – and more importantly, how we solved them – in more detail. But at this point, the main thing to know is that the key really is flexibility. DevOps is an evolving process. Whatever your pipeline, you’ll need to have the ability to be flexible if you’re going to deal with everything real-time has to throw at you.
Using automation
So, now that you’ve got a sense of the architecture and systems involved in the World Expo project, let’s talk about how we used automation to improve our pipelines. As we all know, there are many ways to solve challenges during production. But this and a lot of our projects show that taking the time to explore unconventional solutions can be really worthwhile.
In this case, we used the existing web solution of Jenkins for our build and automation pipeline. Jenkins is quite extensible – it’s open source and has a lot of plugins available. It’s generally not difficult to add features we need, which is why we favour it over other solutions. Additionally, the web interface is convenient, it makes a developers life easier by having everything in one location.
Web CI/CD platforms like Jenkins can be really useful tools to get around the challenges of automated operations, testing and building. But even so, the solution has its pros and cons.
Successes:
- Extensible, creating jobs is simple
- Web interface is convenient
- Remotely accessible
Failures:
- Jobs are slow
- Jobs can be unreliable
- Interface UX is not a seamless as it could be
Depending on the specific needs of your project, definitely check out some of the CI/CD platforms that web teams have already made. Chances are there’s something that will fit your use case – or at least get you that much closer.
Centralised + distributed data
Okay let’s talk through how we centralised our data, what it meant for us, and how you can apply aspects of this to your game or experience.
Centralised and distributed data means taking all of your data out of your user facing machines and putting it all in one place, a ground truth, where you can retrieve it and edit it at any time.
Why would you want to put all of your data into one place? There are a bunch of potential reasons, but here were ours:
- Less deployments
- Smaller deployments
- Content consistency
- Data analytics
So, what did our CCU look like for World Expo? I’m glad you asked, because we just happen to have a diagram for that:
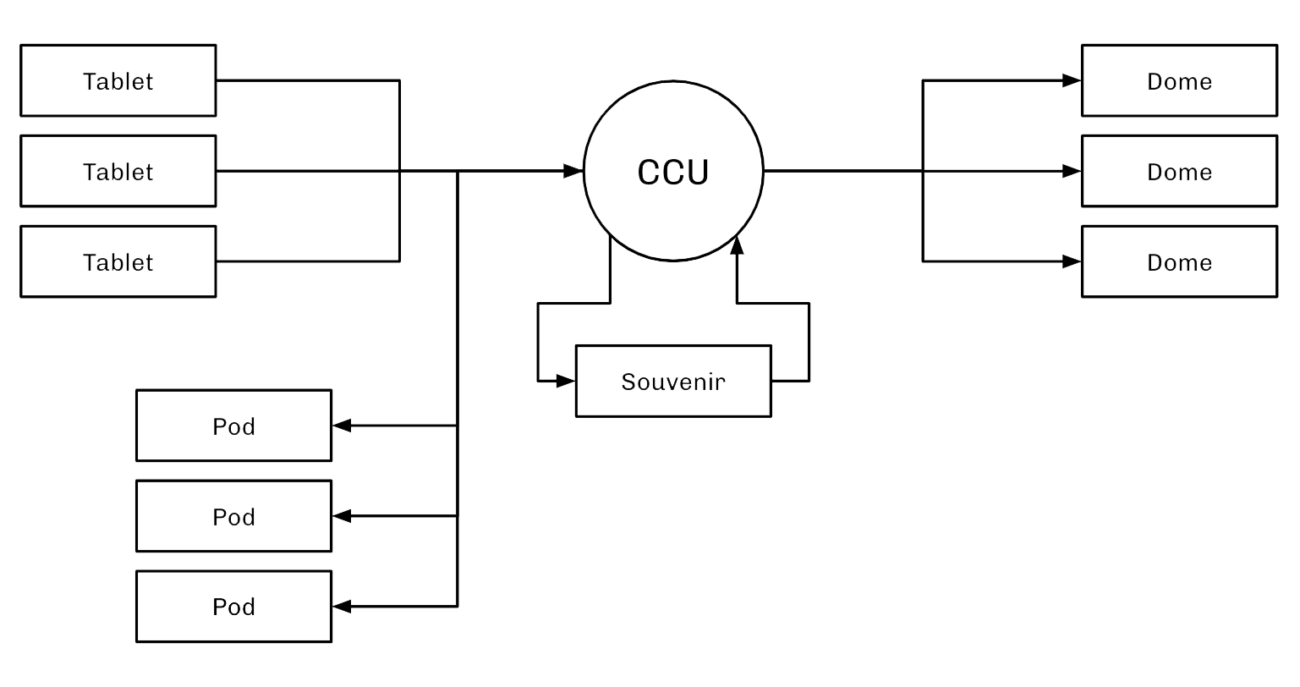
We built a CCU (Central Communications Unit) using a web stack. This was basically the glue between all of our other user-facing machines. Users would interact with the tablet, input information such as their email address, and customise their avatars. That data would then be sent up to the CCU, which was in charge of distributing the data to any machine that needed it.
That data would be sent back down to the pods, where it would be displayed to the user on the screen behind their tablet so they could see their changes in real time. When users went to launch their avatar up onto the dome, the CCU would send that information to the dome and seamlessly orchestrate the launch. The result? You could watch the avatar seamlessly fly from the interaction pod in front of you up onto the huge projection dome above.

The CCU would also feed that data back to the souvenir machines. Here we would render a one minute animated sequence with the user’s custom avatars, which would be emailed to them as a memento of their experience.
While we decided that this was the best solution for World Expo, as with any project, it wasn’t perfect. It had its pros and cons, which are important to recognise when considering this kind of approach for future applications.
Successes:
- Standardise Communication
- Show Orchestration
- Content Consistency
- Scalability (Souvenirs)
- Data Analytics
Failures:
- Not a CMS
- Full re-deployment on new content
Making use of APIs
So, how to actually do this yourself? Well there are a heap of services out there that provide REST APIs for on-demand data access – CMS, non-games, and of course games.
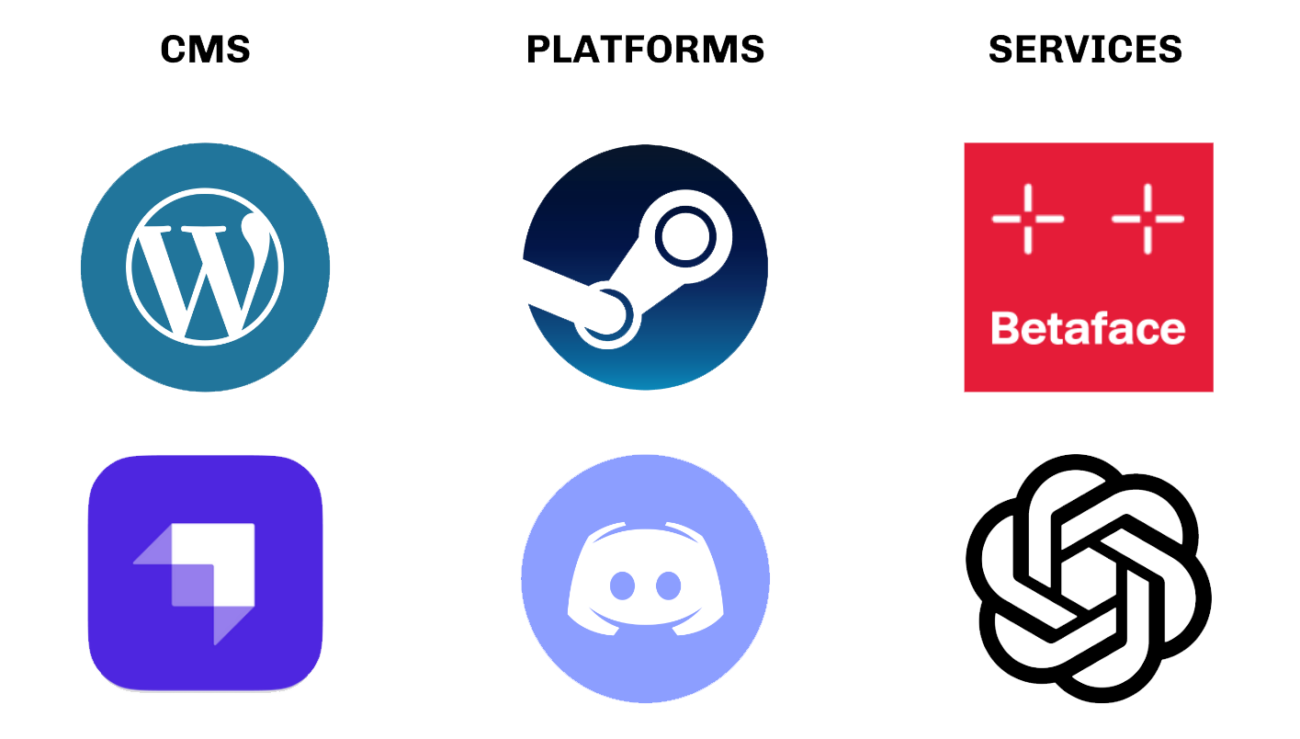
Third party CMS platforms like WordPress and Strappy are great for storing data like localised text or image data or news. Meanwhile, platforms like Steam and Discord can be used as a pseudo CMS for things like user profiles and platform interconnectivity. And you can also use services like Betaface and ChatGPT to inject new content into your game.
Below is an example of using a Steam REST API call to get player profiles. You communicate with the REST endpoint at the top there to get this JSON formatted response. (JSON is a very popular key-value web format.)
GET https://partner.steam-api.com/ISteamUser/GetPlayerSummaries/v2/
{
"response":
   {
   "players":[
      {
         "steamid":"77561198355051011",
         "communityvisibilitystate":1,
         "profilestate":1,
         "personaname":"Mister Manager",
         "lastlogoff":1556305001,
         "profileurl":"https://steamcommunity.com/profiles/77561198355051011/",
         "avatar":"https://steamcdn-a.akamaihd.net/...adf75201b5.jpg",
         "avatarmedium":"https://steamcdn-a.akamaihd.net/...f01a0776adf75201b5_medium.jpg",
         "avatarfull":"https://steamcdn-a.akamaihd.net/...a0776adf75201b5_full.jpg",
      }
    ]
  }
}
In this case, it gives you a response with a list of players. Each of those players has information like URLs so you can download their avatar image, their custom name, their Steam IDs, etc. You can then use that to get more specific information about the player, or to connect to them for multiplayer purposes.
REST in Unreal
Using REST in Unreal is a relatively new thing. Historically, the only way that you’d be able to do this is with a custom plugin. In our World Expo example, we wrote our own. This gave us full control, which was very handy and meant that we weren’t dependent on engine upgrades. Choose the method that works best for your use case.
Custom Plugin:
- Historically the only way
- Full control
- No reliance on engine upgrades
- https:
// github .com /ufna /VaRest
Official WebAPI:
- Quick and easy
- Experimental (buggy)
- Reliable long term
- https:
// www .youtube .com /watch ?v = HOpyZ8552oA
How to apply this to your pipeline
At the end of the day, what all of this means for your pipeline is up to you. Every pipeline is different, so we can’t tell you exactly how to use it. We can, however, try to spark your imagination.
In this next section, we’ll give you a bunch of ideas for different approaches and code examples that we’ve used in the past. These aren’t the only solutions out there; they’re just a primer to get you thinking about what could be possible.

Interfacing with web servers
Our first example revolves around uploading an image over HTTP. It’s a great demonstration of how easy it can be for your projects to interact with web servers. In this case, we’re showing you how to upload an in-game screenshot to a Discord channel, but you could use this process to upload any kind of binary data to a web server.

1. Intercept screenshot
Step one is relatively straightforward. We have to bind to the delegate OnScreenshotCaptured like you see. And at the same time, we’re going to create our Discord core instance for later.
void UMainGameInstance::Init()
{
   Super::Init();

   // Record screenshots
   UGameViewportClient::OnScreenshotCaptured().AddUObject(this, &UMainGameInstance::RecordScreenshot);

   this->DiscordCore = UDiscordCore::CreateDiscordCore(EDiscordCoreCreationFlags::NoRequireDiscord);
}
We’re going to begin by writing the captured screenshot back out to a file because by intercepting it we have stopped that process from automatically happening. Then we’re going to upload that raw colour data into a UTexture2D so it can be displayed on the screen later. And finally, we’re going to create a pop up window. Like you saw earlier, that will give the user the option to either discard it, or upload it straight to Discord if they like it.
void UMainGameInstance::RecordScreenshot(int32 Width, int32 Height, TArray<FColor> const& Colors)
{
   TArray<uint8> PNGColors;
   FImageUtils::CompressImageArray(Width, Height, Colors, PNGColors);
   FFileHelper::SaveArrayToFile(PNGColors, *FScreenshotRequest::GetFilename());

   ASurvivalPlayerController* const Player = Cast<ASurvivalPlayerController>(this->GetWorld()->GetFirstPlayerController());
   if (Player != nullptr)
   {
       UTexture2D* const NewScreenshot = UTexture2D::CreateTransient(
           Width,
           Height,
           EPixelFormat::PF_B8G8R8A8,
           "Screenshot");

       void* const NewScreenshotData = NewScreenshot->PlatformData->Mips[0].BulkData.Lock(LOCK_READ_WRITE);
       FMemory::Memcpy(NewScreenshotData, Colors.GetData(), Colors.GetAllocatedSize());
       NewScreenshot->PlatformData->Mips[0].BulkData.Unlock();

       NewScreenshot->UpdateResource();

       Player->OpenWindow<UScreenshotWindow>(
           this->ScreenshotWindow,
           this)->Configure(NewScreenshot);
   }
}
2. Send screenshot
We are going to then encode the image as a PNG because our web server is designed to handle only PNGs. And then we’re going to fill the json object that we’re going to send to the web server.
void UMainGameInstance::PostImage(UTexture2D* Image)
{
   void* const ImageData = Image->PlatformData->Mips[0].BulkData.Lock(LOCK_READ_WRITE);

   int32 const ImageWidth = Image->PlatformData->Mips[0].SizeX;
   int32 const ImageHeight = Image->PlatformData->Mips[0].SizeX;
   int32 const ImageSize = ImageWidth * ImageHeight;

   TArray<FColor> ImageColors;
   ImageColors.Reserve(ImageSize);
   ImageColors.AddUninitialized(ImageSize);

   FMemory::Memcpy(ImageColors.GetData(), ImageData, ImageSize * sizeof(FColor));

   TArray<uint8> PNGImageColors;
   FImageUtils::CompressImageArray(ImageWidth, ImageHeight, ImageColors, PNGImageColors);

   Image->PlatformData->Mips[0].BulkData.Unlock();

   TSharedRef<FJsonObject> const Message = MakeShared<FJsonObject>();
   Message->SetStringField("author", this->GetWorld()->GetFirstPlayerController()->GetPlayerState<APlayerState>()->GetPlayerName());
   Message->SetStringField("image", FBase64::Encode(PNGImageColors.GetData(), PNGImageColors.GetAllocatedSize()));
   Message->SetStringField("type", "relay");

   if (UDiscordUserManager* const DiscordUser = UDiscordUserManager::GetUserManager(this->DiscordCore))
   {
       Message->SetStringField("author", FString::Printf(TEXT("<@%lld>"), DiscordUser->GetCurrentUser().Id));
   }

   UUploader::Send("http://yourdiscordbot.com.au:3000/", Message);
}
First we will set the author (for attribution purposes). By default it’s going to be the player’s system name. Then we encode the image as base64 and add it to the image tag on the JSON object. Finally, we want to check if we have access to Discord API – i.e. if they have a Discord instance running on their computer. If they are logged in, we will be able to get their Discord user ID. In that case, instead of just printing their name, we can tag them back in the final Discord message. And then finally, we’re going to send this message up to our web server.
3. Discord bot
This Discord bot will handle the message and relay it with the image we sent earlier. But we need to process that a little bit before it gets sent. We’re going to give a file name in case the user wants to download it. That said, some platforms allow you to set whatever username you want, so we’re going to filter their username for profanity just in case.
def relay_image(author, data):
    for guild in client.guilds:
        outputChannel = discord.utils.get(guild.channels, name="subspace-relay")

        message = random.choice(relayMessages).format(author)
        filename = "{0}-{1}.png".format(time.strftime("%Y-%m-%d-%H%M%S"), author)

        if (filter.is_profane(author)):
            message = "Another lovely photograph! This cameraperson has a bit of a... rude name, so lets just call them **{0}**.".format(random.choice(relayCleanNames))

        outputChannel.send(content=message, file=discord.File(data, filename))

        print("Relayed image from {0}.".format(author), flush=True)
4. Success!
Where this could take you…
So that was an example of uploading images to a web server. But it’s an approach you could use to upload data to many other services, allowing you to expand the functionality of your game into the cloud.
A few examples of where this could take you:
- upload crash dumps to a server for you to browse later
- receive and show user created content on a web page
- upload a photo to an AI image service to stylise it
Downloading live data
So we know about uploading images – what about downloading them? Next we’ll show you how to download a user’s avatar from Steams REST API. This is a specific example, but you can use this to download any kind of data from a web server.
1. Content request
The first step is to request the information we need from via its REST API – things like the player’s username and some URLs to their avatar. Once we’ve obtained the avatar URL, we can download the image. Then we can save that image to disk so it doesn’t have to be downloaded again – this will also allow us to import it at runtime using Interchange.
void UImageExample::GetPlayerSummaries(FString Key, TArray<FString> SteamIds)
{
    TSharedRef<IHttpRequest> HttpRequest = FHttpModule::Get().CreateRequest();

    FString URL = TEXT("https://partner.steam-api.com/ISteamUser/GetPlayerSummaries/v2/?key=");
    URL += Key;
    URL += TEXT("&steamids=");
    URL += FString::Join(SteamIds, TEXT(","));

    HttpRequest->SetURL(URL);
    HttpRequest->SetVerb(TEXT("GET"));

    HttpRequest->OnProcessRequestComplete().BindUObject(this, &UImageExample::HandlePlayerSummaries);
    HttpRequest->ProcessRequest();
}
This is what the HTTP request could look like. First we can create a HTTP request by calling CreateRequest. Steam’s API expects some additional information to append to the base URL of the request. So after we create the base URL, we can append our API key along with a comma separated list of Steam IDs.
2. JSON response
Below is the kind of response we are expecting to our request. It’s a JSON object that contains a response. And that response has an array of players, which will have the avatar URLs that we are after, along with some other information we may need.
GET https://partner.steam-api.com/ISteamUser/GetPlayerSummaries/v2/
{
"response":
   {
   "players":[
      {
         "steamid":"77561198355051011",
         "communityvisibilitystate":1,
         "profilestate":1,
         "personaname":"Mister Manager",
         "lastlogoff":1556305001,
         "profileurl":"https://steamcommunity.com/profiles/77561198355051011/",
         "avatar":"https://steamcdn-a.akamaihd.net/...adf75201b5.jpg",
"avatarmedium":"https://steamcdn-a.akamaihd.net/...f01a0776adf75201b5_medium.jpg",
         "avatarfull":"https://steamcdn-a.akamaihd.net/...a0776adf75201b5_full.jpg",
      }
    ]
  }
}
3. UStructs
Now, we don’t want to be stuck working with data in a JSON format – it’s much nicer to work with types that are known at compile time. It’s faster and less error-prone. So we are going to create some USTRUCTs that match the same layout and field names as the JSON object – this will allow us to easily convert between the two later on.
USTRUCT()
struct FPlayerSummariesResponse
{
    GENERATED_BODY()
public:

    UPROPERTY()
    FPlayerSummaries Response;
};

USTRUCT()
struct FPlayerSummaries
{
    GENERATED_BODY()
public:

    UPROPERTY()
    TArray<FPlayerSummary> Players;
};

USTRUCT()
struct FPlayerSummary
{
    GENERATED_BODY()
public:

    UPROPERTY()
    FString Avatar;
};
You can see that here we have a struct that has a response property, the response has an array of players, and a player has an avatar. I’ve only added the avatar field for this example, but you could fill out the rest so it’s 1 to 1.
4. Handling the request
Now we can handle the response. After we check the request was successful and valid, we can get the content of the response as a string by calling GetContentAsString(). This will be the JSON object we are expecting in a string format.
void UImageTest::HandlePlayerSummaries(FHttpRequestPtr HttpRequest, FHttpResponsePtr HttpResponse, bool bSucceeded)
{
    if (!bSucceeded || !HttpResponse.IsValid() || HttpResponse->GetContentLength() <= 0)
    {
        return;
    }

    FString JsonString = HttpResponse->GetContentAsString();

    FPlayerSummariesResponse PlayerSummariesResponse;
    FJsonObjectConverter::JsonObjectStringToUStruct(JsonString, &PlayerSummariesResponse);

    if (PlayerSummariesResponse.Response.Players.IsEmpty())
    {
        return;
    }

    FString AvatarUrl = PlayerSummariesResponse.Response.Players[0].Avatar;
}
Now we can convert this JSON string in our USTRUCT that we defined earlier by calling JsonObjectStringToUStruct. This function will automatically fill out the struct’s properties by utilising Unreal’s reflection system. While these conversion functions will have more overhead than hand writing one for each struct, they make your code much easier to write and maintain. From there we can easily grab the avatar URL from our struct.
5. Download request
Now that we’ve acquired the image URL we need, we can now start downloading it. We’ll need to create another HTTP request, except this time we’ll use the image URL as the URL for the request.
void UImageExample::DownloadImage(FString URL)
{
    TSharedRef<IHttpRequest> HttpRequest = FHttpModule::Get().CreateRequest();

    HttpRequest->SetURL(URL);
    HttpRequest->SetVerb(TEXT("GET"));
    HttpRequest->OnProcessRequestComplete().BindUObject(this, &UImageExample::HandleImageRequest);
    HttpRequest->ProcessRequest();
}
6. Handling the request
To handle the response, we’ll extract the file name from the URL and just save the content to disk. In this case, it will create an ordinary PNG file.
void UImageExample::HandleImageRequest(FHttpRequestPtr HttpRequest, FHttpResponsePtr HttpResponse, bool bSucceeded)
{
    if (!bSucceeded || !HttpResponse.IsValid() || HttpResponse->GetContentLength() <= 0)
    {
        return;
    }

    FString FileName = FPaths::GetCleanFilename(HttpResponse->GetURL());
    FString FilePath = FPaths::ProjectPersistentDownloadDir() / TEXT("Images") / FileName;

    FFileHelper::SaveArrayToFile(HttpResponse->GetContent(), *FileName);
}
7. Importing with Interchange
Now we’re ready to import the image using Interchange. But what is Interchange?
Interchange is Unreal Engine’s new import and export framework. It’s customizable and extensible, allowing you to create your own custom import pipelines. But the coolest thing about Interchange is that it can be used in the editor, and at runtime in a packaged build.
So how can we do that?
UTexture2D* UImageExample::ImportTexture(FString FilePath)
{
    UInterchangeManager& Manager = UInterchangeManager::GetInterchangeManager();
    UInterchangeSourceData* SourceData = Manager.CreateSourceData(FilePath);

    FImportAssetParameters Parameters;
    Parameters.bIsAutomated = true;

    FString ContentPath = TEXT("/Game/ExampleProject/DownloadedImages");
    UE::Interchange::FAssetImportResultRef ImportResult = Manager.ImportAssetAsync(ContentPath, SourceData, Parameters);

    ImportResult->WaitUntilDone();

    if (!ImportResult->IsValid())
    {
        return nullptr;
    }

    UObject* ImportedObject = ImportResult->GetFirstAssetOfClass(UTexture2D::StaticClass());
    return Cast<UTexture2D>(ImportedObject);
}
After getting a reference to the Interchange manager, we can use it to create a source data object. This will hold onto the file path to the image we want to import. Next we create some import parameters, setting IsAutomated to true (otherwise it may create a UI prompt if that has been setup). Then we call ImportAssetAsync with the content path, source data and parameters, which returns an asset import result to us. We wait for it to complete, which will allow us to return the imported asset at the end of the function.
Alternatively, there are delegates you could bind to. After validating that the import was successful, we can extract the imported asset from the import result, and then return it as a UTexture2D. One side effect of doing it this way is that it will register the asset with the asset registry, and show up in the content browser. So assets will persist between play in editor sessions. And they will behave like any other asset in the content browser.
8. Success!
How could you use this…
This process can be roughly applied to other CMS’s or services, to pull in dynamic content like player profiles, news feeds etc.and to download new game assets at runtime.
And using Interchange means it could be applied to more asset types beyond textures when they get support – like meshes or sound files – with minimal code changes. And that could empower you to build a platform that supports dynamic or even user-generated content.
Monitoring Unreal
Now that we can upload and download information from a web server, where else could we take this?
A problem we run into often is getting access to stat data remotely – sometimes with projection projects stats are often obscured from being visible and remotely accessing that computer invalidates the stats.
Next we’ll show you how to hook into various stat commands and log output so you can stream them to a web server.

1. Gathering stat data
We can grab a pointer to the latest copy of stats data for use on the game thread by calling the static function FLatestGameThreadStatsData::Get(). Then we can iterate over all of the active stat groups.
void AImageTest::GatherStats()
{
#if STATS
    FGameThreadStatsData* StatsData = FLatestGameThreadStatsData::Get().Latest;

    if (!StatsData)
    {
        return;
    }

    for (const FActiveStatGroupInfo& ActiveGroup : StatsData->ActiveStatGroups)
    {
        for (const FComplexStatMessage& Counter : ActiveGroup.CountersAggregate)
        {
            FName Name = Counter.GetShortName();
            double AveMs = Counter.GetValue_double(EComplexStatField::IncAve);
            double MaxMs = Counter.GetValue_double(EComplexStatField::IncMax);
            double MinMs = Counter.GetValue_double(EComplexStatField::IncMin);
        }
    }
#endif
}
The active stat group will contain few different FComplexStatMessage arrays, but in this example will go over how we can get information from CountersAggregate. We can do this by iterating over the array and calling GetValue_double to get the value in milliseconds, and GetShortName to the name of the particular stat.
2. Enabling stats
For a stat group to show up in the active stat groups, it needs to be enabled. To do this we can just execute the stat command. But that we don’t need stats on screen, we can add the -nodisplay flag to hide them e.g stat gpu -nodisplay.
But keep in mind, not all stats are the same:
- stat version
- stat fps
- stat summary
- stat unit
- stat drawcount
- stat timecode
- stat framecounter
- stat colorlist
- stat levels
- stat detailed
- stat unitmax
- stat unitgraph
- stat unittime
- stat raw
- stat particleperf
- stat tsr
And that means not all of the stat commands are handled the same way. These stats in particular are handled differently from all of the other stats. So they will not show up in any of the active stat groups. The most notable ones being stat FPS and stat unit.
3. Getting stat FPS and unit
To get the average FPS and frame time, you can define GAverageFPS and GAverageMS in your cpp file and read those values as you need. And for stat unit, we can get that data from the game viewport. Note you will need to run the stat unit command for this data to be populated.
extern ENGINE_API float GAverageFPS;
extern ENGINE_API float GAverageMS;

FStatUnitData* StatUnit = GetWorld()->GetGameViewport()->GetStatUnitData();
float RenderMs = StatUnit->RenderThreadTime;
float GameMs = StatUnit->GameThreadTime;
4. Listening for error and warning logs
Listening for logs is quite simple.
class FExampleOutputDevice : public FOutputDevice
{
public:

    FExampleOutputDevice();
    ~FExampleOutputDevice();

    virtual void Serialize(const TCHAR* V, ELogVerbosity::Type Verbosity, const FName& Category) override;
    virtual void Serialize(const TCHAR* V, ELogVerbosity::Type Verbosity, const FName& Category, double Time) override;
};
We just need to create a class that inherits from FOutputLog, and override one of the two serialise functions, which will be called per individual log.
FExampleOutputDevice::FExampleOutputDevice()
{
    GLog->AddOutputDevice(this);
}

FExampleOutputDevice::~FExampleOutputDevice()
{
    if(GLog != nullptr)
    {
        GLog->RemoveOutputDevice(this);
    }
}

void FExampleOutputDevice::Serialize(const TCHAR* V, ELogVerbosity::Type Verbosity, const FName& Category, double Time)
{
    // GPrintLogTimes will be set by log.timestamp
    FString Log = FOutputDeviceHelper::FormatLogLine(Verbosity, Category, V, GPrintLogTimes, Time);
}
We’ll need to register our output device to start receiving logs, so in the constructor we call AddOutputDevice. And in the deconstructor we call RemoveOutputDevice unregister our output device. From there you can handle it however, just keep in mind that this will execute on the OutputDeviceRedirector thread. You can find some helper functions FOutputDeviceHelper for formatting logs if you need them as a string.
5. Success!
In our case we are sending the logs and stats to a web server using websockets, which allows us to view this information from a web browser. The goal being to create a platform to enhance our delivery pipeline and remote monitoring capabilities.
How you could use this…
While this might seem like a niche example – what we’re really demonstrating is that you can hook into pretty much any system in Unreal and send that data somewhere else.
Want to collect users’ average FPS as part of your analytics? Go for it. Want to get better insights to improve your automation pipeline? No problem!
A quick recap
This has been a long read, and we’ve covered a lot of ground. But hopefully if you’ve made it to this point you’ve got a whole bunch of new knowledge under your belt, and a load of new ideas in your head.

While the examples we covered might not be directly applicable to your projects, we hope that they’ve at least got you thinking about the possibilities. There are many ways to solve the challenges we face, and not all of those solutions are in-engine. Sometimes, looking outside of our comfort zone to other technologies can provide tried and tested solutions that will save you time and effort, in the short- and long-run.
As you can see, and as you probably already know, DevOps and SysOps are constantly evolving processes. There is no one-size-fits-all solution. But that doesn’t mean you have to build everything from scratch. Be flexible in your approach, and arm yourself with a diverse range of solutions. You’re only human – but often that’s actually a good thing.
What comes next
Ultimately, everything we’ve spoken about today is how to make your pipeline more efficient and reliable to make your life easier. By thinking laterally and borrowing solutions from outside of Unreal Engine, you can make your pipeline more robust.
We hope we have inspired you to think about ways you can apply this to your own pipeline.
And don’t forget to let us know if you do!